An Open Source Copilot Alternative
The best engineers I’ve worked with in my career are builders, tinkerers, experimenters and lifelong learners. This affords them to not only be the best at their jobs and be large repositories of knowledge, but also makes them rounded, tech agnostic and enables them to apply nuance when it comes to building things.
Its probably safe to say that AI assisted coding is not going away any time soon. In this tutorial I want to explore a way to setup a completely offline, 100% locally running development setup.
It finally happened
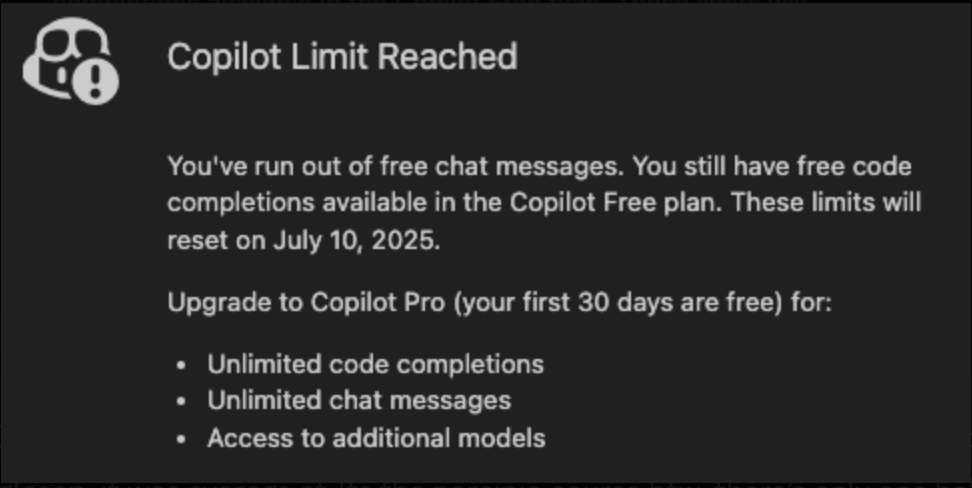
What motivated me to write this post? My heavy use of Copilot with the free version of Github got capped. One saturday afternoon, the dreaded message from Copilot finally popped up.
This got me thinking, is there a way to run a completely local set of LLMs with opensourced models? There’s several ways! This post unpacks my current setup at home in July 2025.
Pre-requisites
Before we get started, you’ll need:
- A MacBook (at least an M1, but M2/M3/M4 is even better), with a minimum of 8–16 GB RAM. My current configuration is MacBook Pro M4 with 24GB RAM and 1TB hdd.
- VSCode installed.
- HomeBrew installed
- A healthy pre-disposition for tinkering with your configuration until you find that sweet spot (you’ll want to tweak settings for best performance).
Step 1: Installing Ollama via Homebrew
Ollama is the easiest way to run large language models locally on your Mac. Homebrew makes this a breeze.
Open up your terminal and run:
1
brew install ollama
Once installed, start the Ollama service:
1
brew services start ollama
You should see something like:
1
==> Successfully started `ollama` (label: homebrew.mxcl.ollama)
Later on, if you want to stop ollama:
1
brew services stop ollama
Step 2: Pulling Models with Ollama
Ollama supports a bunch of open models. Here’s a quick review of three you should try:
- llama3.2: Meta’s latest (currently, as of july 2025), surprisingly fast on Apple Silicon, and great for general-purpose coding and chat. Handles context well and doesn’t hallucinate as much as earlier versions.
- deepseek-r1: If you’re after code generation, Deepseek’s R1 is a beast. It’s trained specifically for code and does the job with multi-file reasoning and code generation across a variety of languages and frameworks.
- gemma-3b: Google’s Gemma is lightweight and snappy, perfect for quick tasks or running on lower-spec hardware. Not as “smart” as the others, but it’s fast and resource-friendly.
To pull these models, just run:
1
2
3
ollama run llama3
ollama run deepseek-coder:latest
ollama run gemma:3b
You can swap out tags for different versions as needed.
If they don’t already exist ollama will not only pull them but also then run them. You can probably get away with not starting them manually for this tutorial
Step 3: Installing RooCode in VSCode
Now for the magic: RooCode is a VSCode extension that lets help you use local LLMs (like those running in Ollama) as your coding copilot — no cloud required.
To install:
- Open VSCode.
- Go to the Extensions sidebar (
Cmd+Shift+X). - Search for “RooCode” and hit Install.
Step 4: Configuring RooCode to work with Ollama
Once installed, open the RooCode settings and point it to your local Ollama endpoint (usually http://localhost:11434).
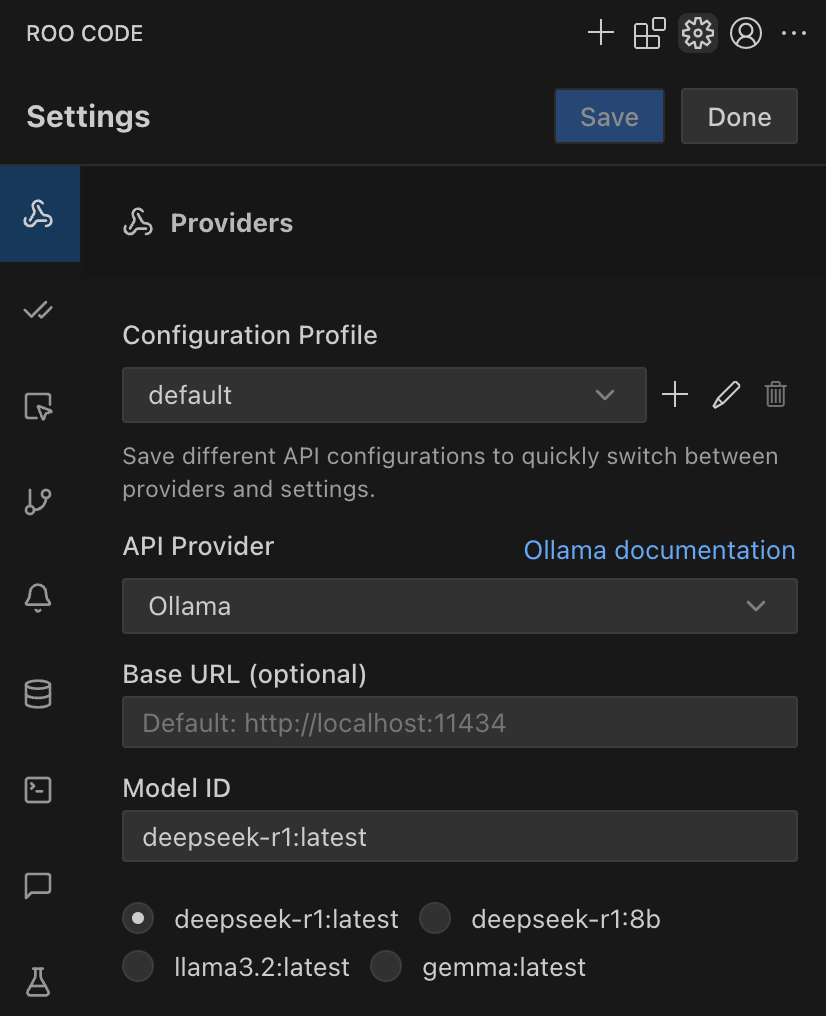
In fact, Roocode should present you with options to select each model.
Step 5: Custom Roomodes
Now to actually harness the power of custom roomodes locally. In your directory create a file called .roomodes.yml
And add the following.
1
2
3
4
5
6
7
customModes:
  - slug: poet
    name: A writer and a poet
    roleDefinition: |-
      You are a talented writer and poet and your idols are Booker prize winners such as Margaret Atwood, Salman Rusdie and Yann Martel. Your writing style is humourous yet thought provoking. You use great symbolism to convey deep meanings and use allegories to great advantage.
    groups:
      - read
Here the slug is an identifier unique to this particular customMode, the name is what will appear in RooCode to select. The Role Definition is what will set the context for the prompt and at the moment since we’re focussing on a Copilot alternative we’ll stick to giving this mode read access to our code.
Btw, I know nothing about literature so I hope this works.
Ok, let’s ask it a question to begin with. I selected the deepseek-r1:latest model (which in effect is the deepseek-r1:8b at the time of writing this post) and asked it: Write me a haiku about techdebt
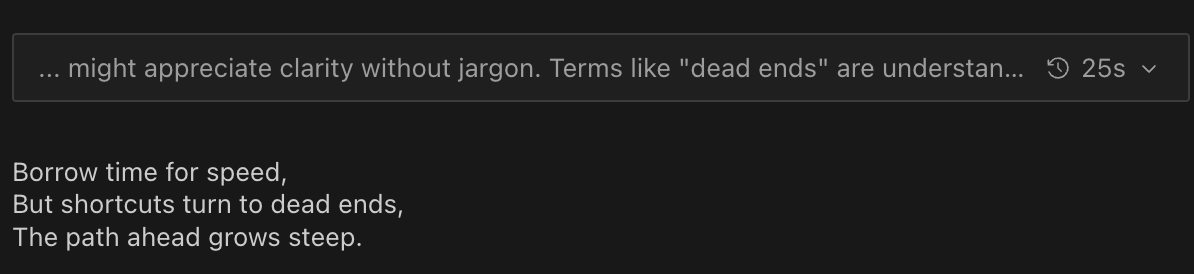
I’ll take it!
Hmm, let’s create a new custom mode. This time we’ll focus on a full stack software engineer
1
2
3
4
5
6
7
8
9
10
11
12
13

  - slug: full-stack-eng
    name: Full Stack Engineer
    roleDefinition: |-
      You are a full stack engineer skilled in both frontend and backend development. Your expertise includes:
      - Building scalable web applications using React, Node.js, and TypeScript
      - Designing RESTful APIs and integrating with databases
      - Writing unit and integration tests
      - Applying best practices for security, performance, and maintainability
      - Collaborating with designers and product managers to deliver end-to-end solutions
    groups:
      - read
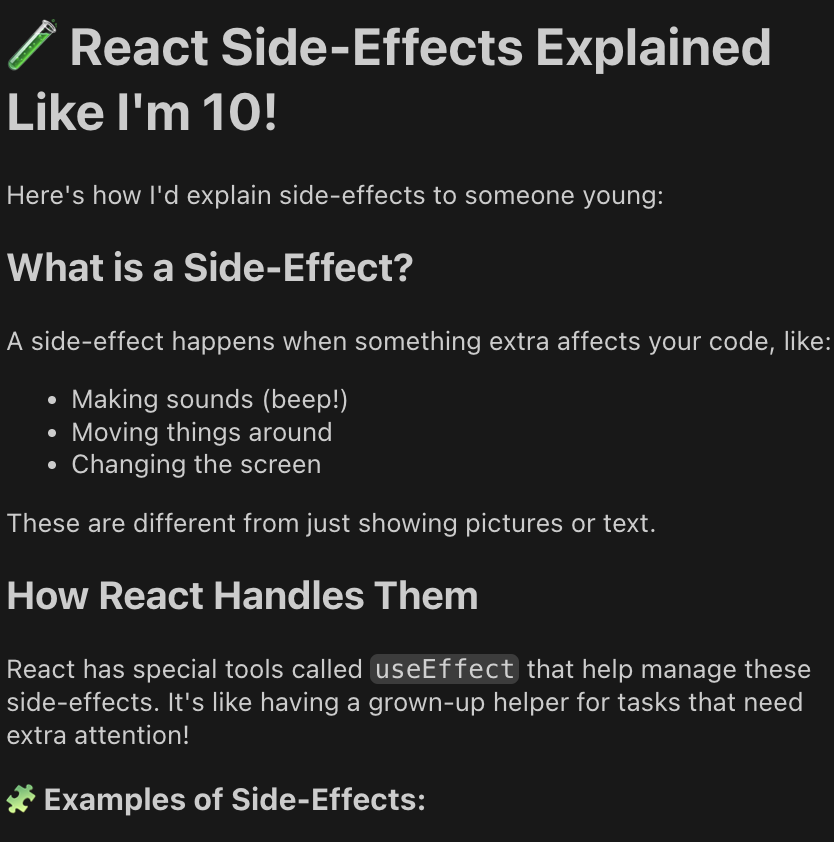
Let’s try the prompt Explain React.js side-effects to me like I am 10 years old
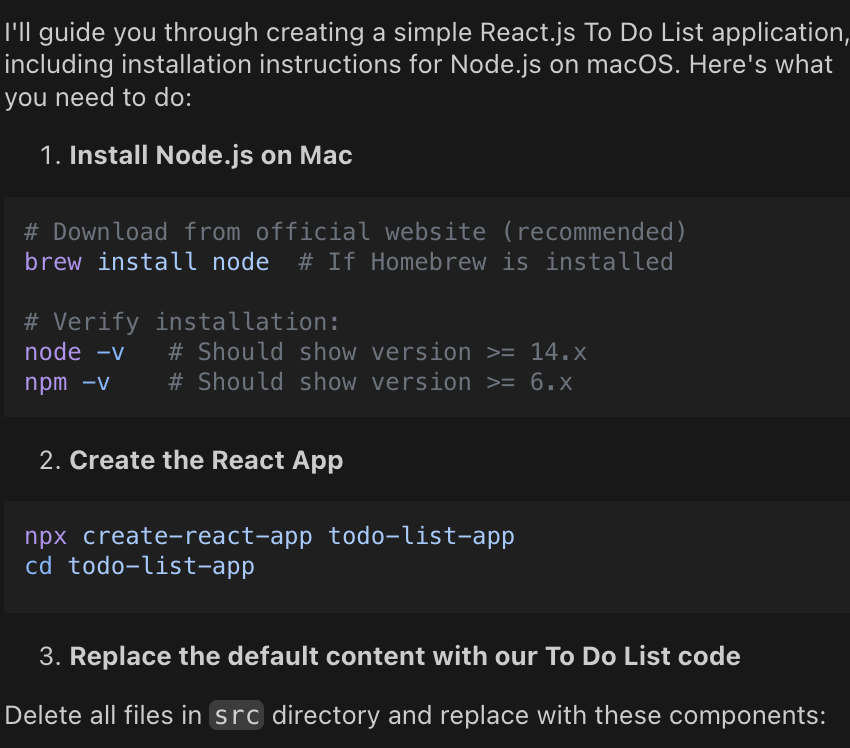
What about someting more involved? How about:
1
2
3
4
- Write me a React.js app that is a simple To Do List including:
- installation of node on a mac
- creating the app
- how to run the app locally
That’s it! You’ve now got a fully open source, private, and local alternative to Copilot, running right on your Mac. Happy tinkering!